In 2025, the global new energy vehicle market continued its rapid growth, with sales exceeding 9.75 million units. New energy vehicles are becoming increasingly popular. However, high-power chargers, a crucial tool for maintaining the continuous operation of these vehicles, while becoming increasingly reliable, can still experience problems. What should you do if your charger suddenly stops working? 
Perhaps you could try repairing it before replacing it with a new one. Howerver, always prioritize safety that 220V circuits carry lethal voltage.
Gather these tools before starting:
Digital multimeter, screwdrivers set, wire strippers, replacement parts, such as fuses, capacitors,ect, cleaning brush, Insulated gloves, safety glasses, and non-conductive shoes.
Step-by-step guide:
1: Visual Inspection: Start with a quick check, many faults are visible.
Cables & Connectors: Look for frayed wires, cracked insulation, or burnt marks on the 220V plug or EV connector. If the connector’s metal pins are bent or corroded, clean them with a dry cloth.
Charger Body: Check for dents, water damage, or a burnt smell.
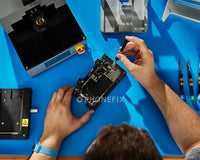
Internal Components: Use an insulated screwdriver to remove the charger’s outer casing. Look for lown fuses, swollen or leaking electrolytic capacitors or burnt resistors or circuit boards.
2: Diagnose with a Multimeter.
Use BSIDE A1X multimeter to confirm issues.Check the 220V Power Input. Plug the multimeter probes into the VΩmA and COM ports. Set it to AC voltage.
Touch the probes to the charger’s 220V plug prongs. If the reading is about 220V, the outlet works. If not, the issue is with your home’s electrical circuit, not the charger.
Check the Internal Fuse. Locate the fuse and remove it carefully. Set the multimeter to resistance (Ω). Touch the probes to the fuse’s two ends.
A reading of 0–1Ω means the fuse is good. Infinite resistance means it’s blown, please replace it with the same amperage rating.
3: Check Capacitors & Resistors.
Ensure the charger is discharged. Set the multimeter to capacitance mode. Touch probes to the capacitor’s terminals. A reading far below the capacitor’s rated value means it needs replacement.
Set the multimeter to resistance mode. Touch probes to the resistor’s two leads. Compare the reading to the resistor’s color code. A mismatch means the resistor is faulty. You nees to replacement a new the new component.
4: Reassemble and Test.
Put the charger’s casing back on and secure it with screws. Plug it into the 220V outlet. Check for unusual noises and overheating.
If it powers on, connect it to your EV. Monitor the first charge for 30 minutes to ensure stability.
If the charger still fails after repairs, or if you find burnt circuit boards, please replace the charger, as internal damage is usually irreparable.
Most electric vehicle charger issues can be resolved with simple steps. Safety should guide every inspection and repair. Regular maintenance of ev charger supports long-term reliability and safety. Drivers who keep the charger clean and inspect for damage help prevent costly downtime.
How to Repair 220V High-Power EV Charger?


